Friday, August 14, 2015

Short Review Friday- Qgirl Stamping Plate

Hello everyone!

Welcome to another Short Review Friday...part 3! I haven't done one in a really long time. I'm finally back from my summer travels so I think now would be the best time to post a bit more blogs about new products, indies, and basically anything that has to do with nails!! 

This stamping plate was sent to me from BornPrettyStore for reviewing purposes! I have been shopping from there for quite a while now so I was very excited when they contacted me. I like that they have free shipping because who doesn't love free shipping?!?! 

This week I will be reviewing this Qgirl stamping plate that I recieved from BornPrettyStore. Of course, as always, I will have direct links to everything I used for this mani. You can also receive 10% off BornPrettyStore using my code 'RAK31'


More about the Qgirl stamping plate:
  • The name of the plate is Qgirl 008
  • It retails for $2.39
  • It includes small sized flowers and bigger sized flowers along with triangles. 

I really like these stamping plates. I have posted before a bit about what works best for me when I stamp in a different blog post ---> Stamping Polish Review. It really does take a lot of practice and patience! Lots of patience! These stamping plates are great because they are inexpensive and they have great images. Plus you get a super quick and easy mani once you have the whole stamping part figured out. The reason I chose this plate was because it reminded me of Bikini Bottoms sky (Spongebob Squarepants). Overall, I have never purchased a stamping plate from BornPrettyStore that did not work great for me. I highly recommend trying them out.

More info on the Mani: 


That's it for part 3 of Short Review Friday! Hope you all have a great Friday! Don't forget to use my code for 10% off your next purchase at BornPrettyStore they have a lot of awesome nail art stuff! :D


Until next time,

Karen (minipolishh)

Monday, August 10, 2015

New Brand Monday: Glitz'd 23

Hello everyone and welcome to another 'New Brand Monday'!

I had the pleasure of swatching 6 amazing polishes for Glitz'd 23
These polishes were sent to me for swatching purposes. 

I was unable to find links to these polishes. I'm not sure if they are available yet. I will link you to her shop so you can see all of her other polishes :)


About Glitz'd 23:

  • Tammy is the owner and creator of Glitz'd 23
  • They are 5-Free
  • This is a U.S. brand and ships from the U.S. 
  • She makes a huge variety of polishes (thermal, shimmer, holo, glow in the dark)

Here are the swatches I did :D All 6 polishes are described to be cremes with holographic sparkle. All of these polishes needed no more than 3 coats and were topped off with HKGirl topcoat. All polishes were very smooth and easy to apply, I had no problem with application. YAY! 

This is Limoncello a bright yellow polish with holographic sparkle. The holo appears very subtle in this polish. It really is very bright! I'm not a fan of yellow but this one is gorgeous! 


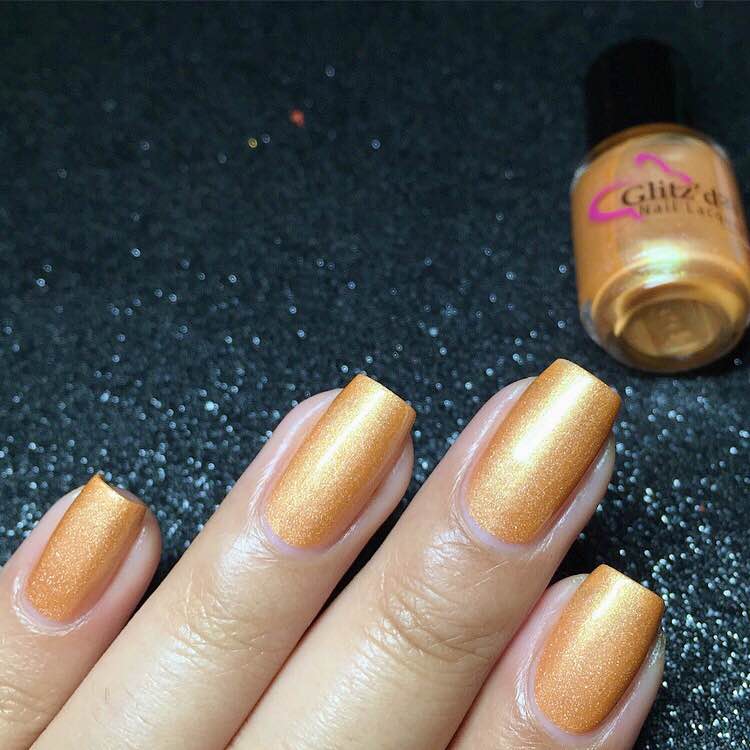
 This next polish is Bellini an orange polish with holographic sparkle.  As you can see, the holo is much more noticeable on this one than on Lemoncello! 


Pink Campari is a pink polish with holo sparkle. This one also has very visible holo sparkle to it. The pink appears a bit dusty to me, like an orangey color. What do you think?


Mint Mojito, is a bright blue polish with holographic sparkle. It's soooo pretty! Of course, my favorite color is blue so yeah I love this!


This was my favorite from the collection! Grape Martini is a purple polish that seems to have some blue shimmer to it. Depending on how you look at it you'll see some blue. 


Last but not least is Blue Hawaiin, a dark blue polish with holographic sparkles. It's beautiful and you can definitely notice the scattered holo. 


Which one was your favorite? Have you heard of this brand before?

Until next time,

Karen (Minipolishh) 

Friday, August 7, 2015

My Nail Care Routine

Hello everyone!

I've been asked a couple times on Instagram about my nail care routine. I figured I would write a step by step process on what I do to keep my nails looking healthy. Like always I will provide direct links to everything that I have purchased online.

Disclaimer: This is what works best for me. What works best for me may not work best for you.


Step One: 
I begin by removing my nail polish with Beauty Secrets Nourishing Acetone (pink bottle). I purchase this bottle from Sally's Beauty Supply store for about $2-3 dollars. This has been probably the only acetone that does not dry out my nails! It also smells delicious.

Step Two:

After I remove my nail polish I begin to shape my nails with any Nail File. My all time favorite nail files are purchased though Ulta and they come in a pack of 3! I normally wait until they go out of season and they discount them for less than a dollar. I think any nail file will work. I just prefer these because they feel soft to me. 

Step Three:

Once I'm done filing away I buff out my nails in order to get rid of all the ridges. I purchased a nail polish that left my nails horribly stained! The nail polish is now discontinued so no need to mention it. A long time ago I purchased a kit from a kiosk at the mall called OnsenSecret. The kit comes with an amazing Cuticle Conditioner and a nail buff that I love! I purchased my kit for 20 dollars. The kit online is much more expensive, if you see them at your mall make sure to try it out! I really like this kit. 

 This is what my nails look like once I'm done with them. As you can see, my hands are very dry. 


Step Four:
Time for a mani bath! I purchased these mani bombs from Forever Polished. Basically what they do is hydrate your fingers (yay!)

I follow these instructions: (taken from their website) 
To use: You'll need a medium size bowl or a foot soaker. Warm water filled to the amount you would like. If the water is to cold some butter may not melt. Drop 1 Mani Bomb in and watch it fizz. You can place hands in while it is fizzing or wait. The oils and salts will release and butter will melt. (Some have Jojoba Beads, they will float in the water and are used for a rub to exfoliate. Just rub hands or feet & cuticles together in the water.) Let  soak for 10-15 mins.  Pat hands dry when done. Avoid washing for 30 mins for best results. I recommend only using about once a week. Over soaking can damage nails.  This is now a great time to push back your cuticles and to rub some butter or oil on them! 


Here is the one I used for this mani: Black Raspberry Vanilla. Yummy!


Step Five:
Once I'm done with allllll of those other steps, I apply some cuticle conditioner. This comes with the kit i have mentioned before. 

You don't have to purchase this I just really like it and it wasn't very expensive when I bought mine. 


Ok, so I apply the cuticle conditioner all over my cuticles and the sides of my nails. By now my cuticles should be ready to be pushed and cleaned.


Step Six:
These are the two items I used to push my cuticles and clean out all that nasty gunk out of my nails. The Cuticle Conditioner works to take out off that extra nastiness I may have missed when taking off my nail polish. 

I used the Revlon Expert Nail Groomer (left) to help clean out the nasty gunk out of my nails.

I use the Hangnails Remover (Right) to take off any excess cuticle I may have or any hangnails. I normally get one or two hangnails because my fingers and hands tend to get extremely dry. 


Step Seven:
(Congrats if you've made it this far) These next two products are "this OR that" products. You don't need both but sometimes I prefer one over the other simply because they are two different textures and sometimes my cuticles aren't too dry. 

This cuticle oil has worked wonders on my nails. Cuticle oils have been very popular lately and practically every indie shop sells them. Stardust Polish Cuticle Oil has saved my finger tips and cuticles so many times.

I leave this on for about 10 minutes while I massage my cuticles. Once i'm done I wash my hands and put some hand lotion. 


OR!

I apply Lush Cuticle Butter on my cuticles and I massage my cuticles. I also wait about 10 minutes then lather it all over my hands then wash my hands once i'm done. This one is a bit more expensive but it has lasted me almost a whole year! 


This is what my nails look like after being washed. 


For this picture I hadn't applied my base coat yet but my favorite so far has been 
Cirque Colors HoldFast


So that's it! That's my nail care routine. Hope it was helpful. I like to google and watch youtube videos about nail care routine so somethings I have learned through other people and some I have tried on my own. 

Until next time,

Karen (Minipolishh)


Monday, August 3, 2015

New Brand Monday- EchoesPolish


 Hello everyone!

Welcome to a different type of blog post. 'New Brand Monday' where I talk about a new brand I recently discovered. There are A LOT of indie brands out there that I probably never heard of and they probably make AMAZING polishes. I hope by you reading this blog post you get the courage to try a new indie brand.

Today I will be talking about Echoes Polish. These polishes were sent to me for swatching purposes and I figured they would be great to review. Before I was contacted by EchoesPolish I had no clue who they were and what the quality of their polishes were like.

About EchoesPolish:

  • It is run by two sisters (Kristyn & Shannon) 
  • They are from Canada
  • International shipping is available! yay!!
  • They make a huge variety of polishes (thermals, holos, jellies, flakies, and many more)
  • They are 5free, vegan friendly and cruelty free 

Here are the swatches I did of these beautiful polishes. 3 coats were used and topped with HK girl topcoat. Each bottle has a wide brush which made the application a lot easier.


Deepest Depth is a black linear holographic polish with a hint of glitter. I like to think of this polish as the black version of Orly's Mirrorball. It reminded me a lot of it. Applications was very smooth.


My Own Silver Lining is a silver linear holographic polish with a hint of glitter. Make sure you wear sunglasses when you're out in the sun. 


Cara-Mellow is definitely a hard one to describe, it's on the neutral side and also contains a hint of glitter. 


Tedious Work is a gorgeous blue holographic polish. This one was my favorite from the collection, mainly because my favorite color is blue haha. 


Tender Things is a purple holographic polish. The purple is so bright, I even wore it for 3 days after I finished swatching all the other polishes. 


Reckless Love is a subtle pale pink holographic polish that look very bright under direct sunlight. 


Overall, I am very excited that I was able to swatch for such an awesome brand. I love love love holographic polishes and these have such a strong holo. If you get the chance I definitely recommend trying them out!  

Will you be trying out this brand? Which colors did you like?
What are some indie polishes that you cannot live without?

Until next time,
Karen (minipolishh)